In this step by step WordPress tutorial with pictures, we will show you how to setup domain mapping for WordPress Multisite.
First you’ll have to have your WordPress Multisite up and running. You can follow the official guide to doing that:
https://codex.wordpress.org/Create_A_Network
After the Multisite has been setup you can bind other domains that you own to your subsites. Before WordPress version 4.5 that was done using plugins like WPMU Domain Mapping, however, since version 4.6 and above that feature has been implemented by default.
For example let’s say that you have the following two domains:
example.com
testaddon.com
where example.com is your primary domain, while testaddon hasn’t been associated with your hosting account yet.
Step 1 – Point your domain name to the correct DNS and Create Addon Domain
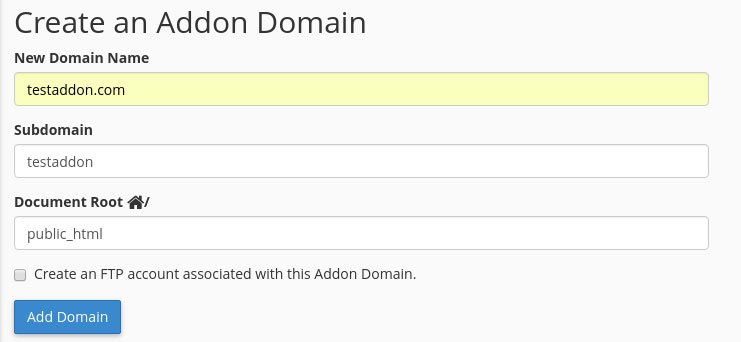
After you’ve set up example.com as Multisite we need to associate your testaddon.com to your hosting account. You can do this by changing the Name Servers (NS settings) for your testaddon.com to be the ones for your cPanel account, they’re also visible from your WebHostFace Client Area (My Account -> Manage). Then we’ll add testaddon.com as an Addon Domain through your cPanel and have it’s root directory to be public_html. For this we’ll navigate to cPanel -> Addon Domains and enter the following:
New Domain Name: testaddon.com
Subdomain: (default) testaddon.example.com
Document Root: public_html
*Note: If the Multisite that you’ve set is not your primary domain (thus it doesn’t correspond to public_html) you’ll have to adjust the “Document Root:” field to be the root directory for your Multisite.

Step 2 – WordPress Dashboard for the Multisite setup
After your testaddon.com has it’s name servers and Addon Domain settings adjusted we’ll go to your WordPress Dashboard for the Multisite. From the Dashboard we’ll navigate to:
Dashboard -> My Sites (on the top left) -> Network Admin -> Sites

This page holds all of our sites that are connected to the Multisite. For our example we have the following two sites:
example.com
example.com/map

Step 3 – Set Up domain Mapping
What we want to do here is to have example.com/map to be opened like testaddon.com, so we’ll do the following:
Mouseover example.com/map -> Edit -> Change Site Address (URL) from http://example.com/map/ to http://testaddon.com/


That’s all that we have to do, now our testaddon.com will open the content of the example.com/map subsite.
You can benefit from a fast and reliable SSD WordPress Multisite Hosting with our shared hosting services. Now with a greatly discounted price! Start your new WordPress project without investing a large amount of money and grow your online presence!

